Authenticating applications using OpenID Connect on K8s using Sidecar - Part 2
Welcome to Part-2 of "Authenticating web applications using OpenID Connect without having to change to app code"
I am going to follow this article from openshift to setup and configure OpenID-Client Client
Here is the summary of things that you need to perform and you could follow the above article.
You have to create the following using the admin console of Keycloak server
- Create ClientID "gatekeeper"
- Create Protocol Mapper - "audience"
- Add Users and Groups
Note: You may use "master" realm or create your own realm say "local"
For this example, I am going to stick with default "master" realm.
I did not use Ingress but instead leveraged kubectl port-forward feature to expose both keycloak server url as well as the keycloak gateway sidecar.
For this example, I used my gatsby application container as sample web application. This is simple static documentation application hosted in Nginx Server. The docker image can be found under the docker hub https://hub.docker.com/repository/docker/livecontainer/nginx-gatsby-sample
For more information about this image please refer my git repo here
Here are the resource definition files for deploying applications, sidecar/gatekeeper in kubernetes cluster.
deployment.yaml
 1---
 2apiVersion: apps/v1
 3kind: Deployment
 4metadata:
 5  name: nginx-gatsby
 6  namespace: ns-keycloak
 7spec:
 8  replicas: 1
 9  selector:
10    matchLabels:
11      app: nginx-gatsby
12  template:
13    metadata:
14      labels:
15        app: nginx-gatsby
16    spec:
17      containers:
18        - name: nginx-gatsby
19          image: livecontainer/nginx-gatsby-sample:latest
20          resources:
21            limits:
22              cpu: "1"
23              memory: 512Mi
24            requests:
25              cpu: "0.5"
26
27        - name: gatekeeper
28          image: carlosedp/keycloak-gatekeeper:latest
29          resources:
30            limits:
31              cpu: "1"
32              memory: 512Mi
33            requests:
34              cpu: "0.5"
35          args:
36            - --config=/etc/keycloak-gatekeeper.conf
37          ports:
38            - containerPort: 3000
39              name: service
40          volumeMounts:
41            - name: gatekeeper-config
42              mountPath: /etc/keycloak-gatekeeper.conf
43              subPath: keycloak-gatekeeper.conf
44            - name: gatekeeper-files
45              mountPath: /html
46      volumes:
47        - name: gatekeeper-config
48          configMap:
49            name: gatekeeper-config
50        - name: gatekeeper-files
51          configMap:
52            name: gatekeeper-files
configmap.yaml
 1---
 2apiVersion: v1
 3kind: ConfigMap
 4metadata:
 5  name: gatekeeper-config
 6  namespace: ns-keycloak
 7
 8data:
 9  keycloak-gatekeeper.conf: |+
10    # is the url for retrieve the OpenID configuration - normally the <server>/auth/realms/<realm_name>
11    discovery-url: http://10.32.0.198:8080/auth/realms/master
12    # skip tls verify
13    skip-openid-provider-tls-verify: true
14    # the client id for the 'client' application
15    client-id: gatekeeper
16    # the secret associated to the 'client' application
17    client-secret: 23b73a87-92d9-4be6-b7b5-62b16d03b9d6
18    # the interface definition you wish the proxy to listen, all interfaces is specified as ':<port>', unix sockets as unix://<REL_PATH>|</ABS PATH>
19    listen: :3000
20    # whether to enable refresh tokens
21    enable-refresh-tokens: true
22    # the location of a certificate you wish the proxy to use for TLS support
23    tls-cert:
24    # the location of a private key for TLS
25    tls-private-key:
26    # the redirection url, essentially the site url, note: /oauth/callback is added at the end
27    redirection-url:  http://192.168.64.10.xip.io:8090
28    secure-cookie: false
29    # the encryption key used to encode the session state
30    encryption-key: vGcLt8ZUdPX5fXhtLZaPHZkGWHZrT6aa
31    # the upstream endpoint which we should proxy request
32    upstream-url: http://127.0.0.1:80/
33    forbidden-page: /html/access-forbidden.html
34    resources:
35    - uri: /*
36      groups:
37      - myapp
38---
39apiVersion: v1
40kind: ConfigMap
41metadata:
42  name: gatekeeper-files
43  namespace: ns-keycloak
44
45data:
46  access-forbidden.html: |+
47    <html lang="en"><head> <title>Access Forbidden</title><style>*{font-family: "Courier", "Courier New", "sans-serif"; margin:0; padding: 0;}body{background: #233142;}.whistle{width: 20%; fill: #f95959; margin: 100px 40%; text-align: left; transform: translate(-50%, -50%); transform: rotate(0); transform-origin: 80% 30%; animation: wiggle .2s infinite;}@keyframes wiggle{0%{transform: rotate(3deg);}50%{transform: rotate(0deg);}100%{transform: rotate(3deg);}}h1{margin-top: -100px; margin-bottom: 20px; color: #facf5a; text-align: center; font-size: 90px; font-weight: 800;}h2, a{color: #455d7a; text-align: center; font-size: 30px; text-transform: uppercase;}</style> </head><body> <use> <svg version="1.1" xmlns="http://www.w3.org/2000/svg" xmlns:xlink="http://www.w3.org/1999/xlink" x="0px" y="0px" viewBox="0 0 1000 1000" enable-background="new 0 0 1000 1000" xml:space="preserve" class="whistle"><g><g transform="translate(0.000000,511.000000) scale(0.100000,-0.100000)"><path d="M4295.8,3963.2c-113-57.4-122.5-107.2-116.8-622.3l5.7-461.4l63.2-55.5c72.8-65.1,178.1-74.7,250.8-24.9c86.2,61.3,97.6,128.3,97.6,584c0,474.8-11.5,526.5-124.5,580.1C4393.4,4001.5,4372.4,4001.5,4295.8,3963.2z"/><path d="M3053.1,3134.2c-68.9-42.1-111-143.6-93.8-216.4c7.7-26.8,216.4-250.8,476.8-509.3c417.4-417.4,469.1-463.4,526.5-463.4c128.3,0,212.5,88.1,212.5,224c0,67-26.8,97.6-434.6,509.3c-241.2,241.2-459.5,449.9-488.2,465.3C3181.4,3180.1,3124,3178.2,3053.1,3134.2z"/><path d="M2653,1529.7C1644,1445.4,765.1,850,345.8-32.7C62.4-628.2,22.2-1317.4,234.8-1960.8C451.1-2621.3,947-3186.2,1584.6-3500.2c1018.6-501.6,2228.7-296.8,3040.5,515.1c317.8,317.8,561,723.7,670.1,1120.1c101.5,369.5,158.9,455.7,360,553.3c114.9,57.4,170.4,65.1,1487.7,229.8c752.5,93.8,1392,181.9,1420.7,193.4C8628.7-857.9,9900,1250.1,9900,1328.6c0,84.3-67,172.3-147.4,195.3c-51.7,15.3-790.8,19.1-2558,15.3l-2487.2-5.7l-55.5-63.2l-55.5-61.3v-344.6V719.8h-411.7h-411.7v325.5c0,509.3,11.5,499.7-616.5,494C2921,1537.3,2695.1,1533.5,2653,1529.7z"/></g></g></svg></use><h1>403</h1><h2>Not this time, access forbidden!</h2><h2><a href="/oauth/logout?redirect=https://google.com">Logout</h2></body></html>
48---
After successfully applying the yamls you should see sample web app pod running with service deployed.
 1
 2kubectl get all -n ns-keycloak
 3
 4NAME                                READY   STATUS    RESTARTS   AGE
 5pod/nginx-gatsby-5465669d87-dpd4k   2/2     Running   0          39m
 6
 7NAME                   TYPE       CLUSTER-IP   EXTERNAL-IP   PORT(S)        AGE
 8service/nginx-gatsby   NodePort   10.32.0.53   <none>        80:30974/TCP   100m
 9
10NAME                           READY   UP-TO-DATE   AVAILABLE   AGE
11deployment.apps/nginx-gatsby   1/1     1            1           39m
12
13NAME                                      DESIRED   CURRENT   READY   AGE
14replicaset.apps/nginx-gatsby-5465669d87   1         1         1       39m
Ensure the two port-forwards are running and now you could hit the gatekeeper sidecar url.
Now, I am going show you "Access denied" to the application. To show this, I will use "tuser3" which does not belong to group "myapp".

After you login you will not be able to access the sample web application that is hosted along with the gatekeeper container

Now try login using the user credentials "tuser1", who belong to the group "myapp". You will be successfully authenticated and the sidecar would redirect the url to the actual application.

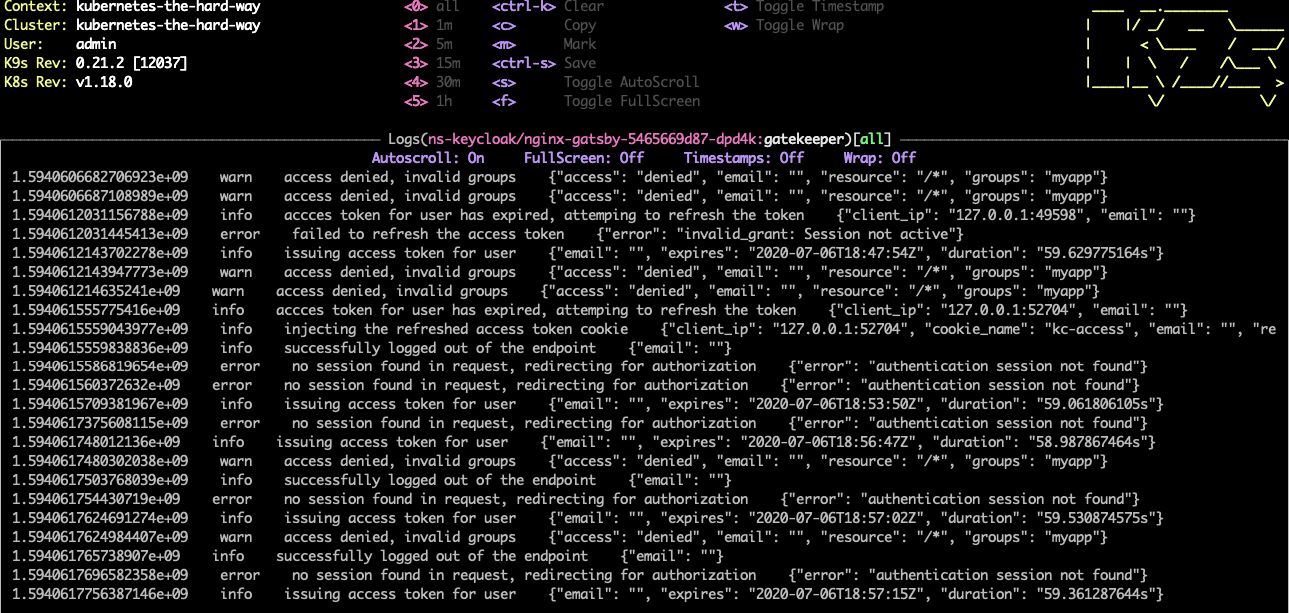
Here is the view of the gatekeeper container logs

Conclusion:
This shows how you can leverage the Identity and access management tools to authenticate applications without having to write single line of code in the web application. This leverages the kubernetes distributed design of containers and pods. Additionally if you are looking for concealing the applications further you can look at enforcing pod network polices as well as look at leveraging service mesh technology to enforce more security controls.